Have you upgraded your wifi router or switched to an ISP that gives you a modem with an inbuilt wifi router, and then tossed aside your old wifi router which sits there gathering dust? How about putting it to use in combination with your existing router so as to get coverage in that one room of your house which has always been a poor coverage zone? The good news is that all basic routers can be put to use as an ‘Access Point’ (AP) or in simple words a secondary range extender for your primary router. Some routers come with a dedicated AP mode, where it is as simple as switching the operating mode from router to AP. In more basic routers the configuration needs to be done manually but it is a fairly simple process that takes under 10 minutes to set up.
Steps for setting up of the Access Point:
- To begin with, we would need to know the IP address of our primary router. This is often printed on a label at the back or bottom of the router. This is usually something like 192.168.0.1 or 192.168.1.1 and entering that into the browser of your PC or laptop which is connected to the primary router via Ethernet cable will open the network interface dashboard which you can access by entering the username and password, usually something like admin or user.
- Once you access the dashboard of the primary router you need to check out the DHCP range which may be under the WAN settings and if your router’s IP is 192.168.1.1 then the DHCP would ideally range from 192.168.1.100 to 192.168.1.254, if not then you can manually set it up to this so that the IP addresses from 192.168.1.2 to 192.168.1.99 become free for allotment as static IPs.
- Now it is best to factory reset your spare secondary router so that its IP address is reset to the default one printed on the label on its back or base and connect it to your PC or laptop using an ethernet cable connected to one of its LAN ports. Enter the default IP of the router in the browser and login using the default credentials to access the dashboard.
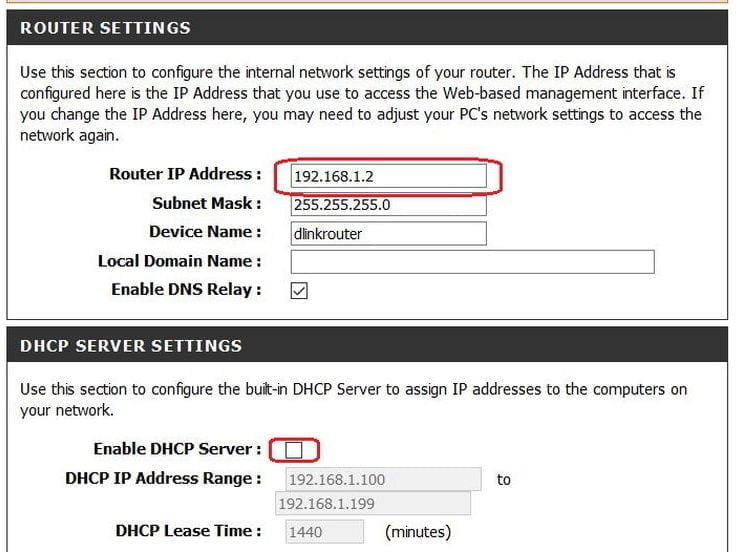
- Now you need to change the IP address of the secondary router such that it is outside the DHCP range of the primary router to prevent an IP conflict in the future. in our case, we can set it as 192.168.1.2 since it is an unused IP from the primary router’s static IP range.
- Next and one of the most important steps is to disable the DHCP server capability of the router which essentially converts it into an Access point or a slave of the primary router.
- Now it is advisable to set the SSID (Wifi network name) and Password of the wifi network of the secondary router to the same as the one on the primary router. This will ensure a smooth handover of the devices between both routers as you move around to different corners of the house.
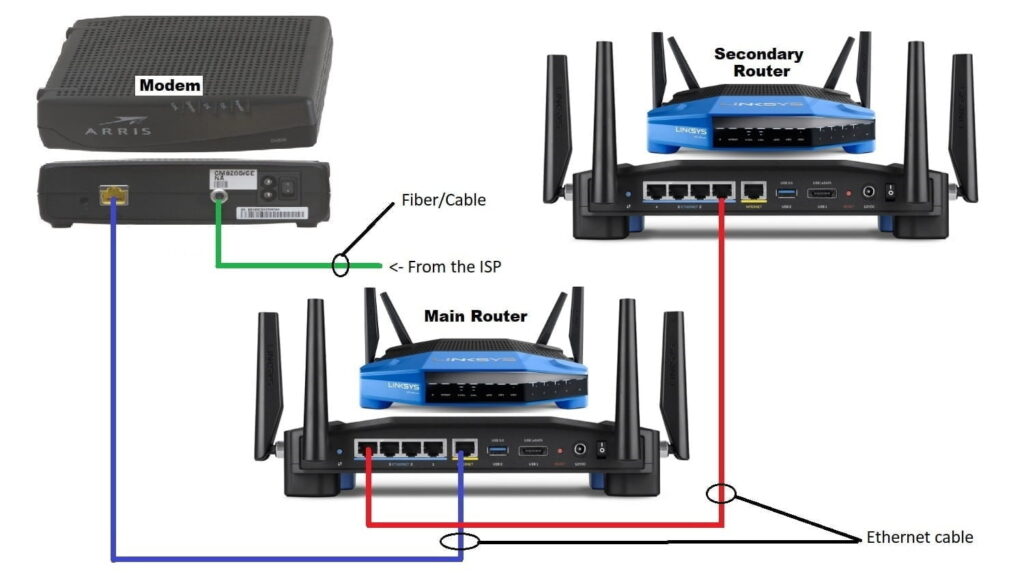
- Now that the secondary router has been set up as an access point, comes the most important step in the setup process. You will need to connect the primary and secondary routers with an Ethernet cable, preferably get a 10 to 30 meter one (depending on the distance of the poor coverage zone from the primary router) with Cat-6 version for fast connectivity.
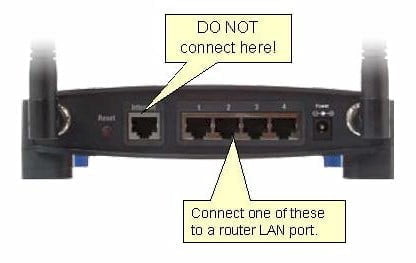
- Ensure that the Ethernet cable is connected from an empty LAN port on the primary router to a LAN port on the secondary router which is now an AP. Refer to the image above to make sure that you do not connect it to the WAN port on the AP by mistake. Now power on the AP and enjoy a blanket wifi coverage in your entire house.
Some people would argue that it is better to set up the secondary router in wireless repeater mode for range extension if available instead of the access point mode so as to avoid running an ethernet cable across the house. But I personally believe the speed and reliability that one can get in the AP mode is far superior to what one can get in the wireless repeater mode since the signal loss over wired connection is negligible compared to the loss over wireless connection between the two routers. If you have a similar setup in your house or workplace, do share your experience through the comments section below.
nice article,,, i was lloking to set my old D-link ADSL modem+router to AP mode.
it is outside the DHCP range???192.168.1.2?
If your primary router IP address is 192.168.1.1 then the DHCP range can start from either 192 168.1.2 or 192.168.1.100 and if it is the second case then it leaves the entire range from 192.168.1.2 to 192.168.1.99 outside the DHCP range and these can be used as static IPs. If you don’t want to reserve this initial range for static IPs then u can keep the entire range from 192.168.1.2 to 192.168.1.254 as the DHCP range and then manually bind the MAC address of your AP to it’s IP address within the DHCP range so that your primary router always reserves that particular IP for the AP and doesn’t assign it to any other device on the network to avoid IP conflict.